


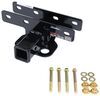
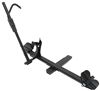
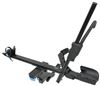
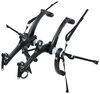
Compact, wall-mounted rack holds 1 bike by the front wheel in your home, garage, or office. Pivoting hook lets you swing bike against your wall to conserve space. Hook folds into housing when not in use. Mounting hardware included.
Specs:
Features:
Videos are provided as a guide only. Refer to manufacturer installation instructions and specs for complete information.
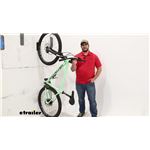
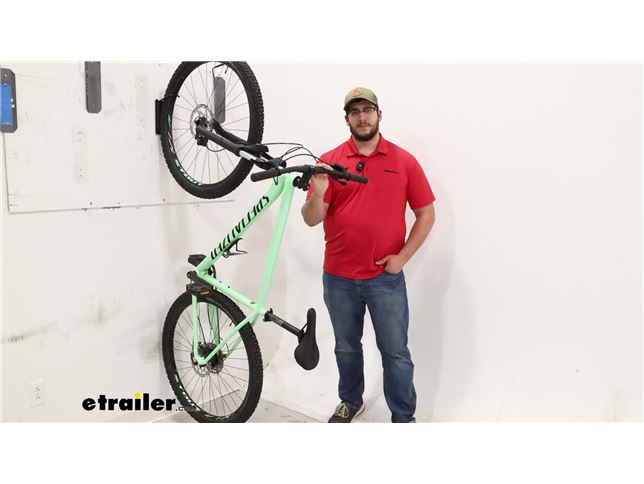
Hi Matt with etrailer, and today we're talking about the Feedback Sports Velo Hinge 2.0 bike wall mount. Now this will be a great option for you if you have a garage and you have your bikes mounted to the wall and you're running outta space or it's really hard for you to park your vehicle. Having this system today is gonna allow you to save a lot of space because you're gonna be able to push this over to the side and when you don't have a bike on here, you can actually fold that hook into itself to make your wall pretty flush. But let's take a closer look at it. To really show you guys what I'm talking about, about it saving space, I'm gonna get a measurement that's gonna be from the wall to the furthest point out, which is gonna be your handlebar bars in this case, that's gonna be about 43 inches. So now when I fold this in, as you can see, this isn't gonna stick out near as far.
And the closest point or the furthest point we're gonna have at this time is going to be about 33 inches. So that's gonna save you about 10 inches of space. There's a couple things to think about though is the first thing. We have a hook over here that's preventing this from going any further in. So in theory this will get even closer.
And to go off of that is we have a large mountain bike with some pretty far out handlebars. Really this is more designed for your road bikes too. So those handlebars are gonna sit a lot more close. So you're gonna get this really close to your wall. Part of the reason why I say this is more designed for road bikes is also the size of this hook.
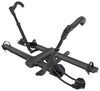
This hook is designed the fit tire sizes three inches wide and 3 7/8 inches in depth. And as you can see right here, we're really pushing that measurement right now. So like when you'll see later on when we're getting this tire or this bike up here, it's kind of a pain to do this because that door wants to open up as we're placing in place and it can be kind of tricky to do. Now if you do have a bike with more thin tires like a road bike, that's gonna make it a lot easier. And here's what that process is gonna look like.
Me just lifting up my bike, At the ground mine at the forks, just to get a little bit more control of it and really just lining it up there and see the door already wants to open up, so I'm going to try to arrange this so it can sit on there. We also wanna make sure we're not having all that weight leaning on here, so we wanna make sure it's in the center. Part of what made that a little bit more difficult to put in place is we're gonna have this textured tape on it. So that textured tape is actually really nice when you have a little bit of a smaller tire size because it's gonna help grip your tires so they're not spinning when they're up here. And at the bottom we're gonna have this secondary piece of hardware and this is gonna be a bracket that connects to your wall and that's gonna prevent your tire from sliding out way over here. As you can see, we already have a couple marks on our wall and we we inchesre trying it out earlier without the bracket and it really does make a difference. As for the weight capacity, that's gonna be 50 pounds per bike, which is a decent amount too. Now as you can see, this is a mountain bike and it's a little bit heavier, so that's when it really comes into play. When you're mounting this, it's very important to put this on the studs, 'cause you're gonna have a lot of pressure pulling on them. And to go off of that, if you really needed to, you could put a smaller e-bike up here. I definitely make sure it meets those specs. You probably have to remove that battery too. And like I was saying earlier, this does have the ability to fold in on itself. So earlier when we swung it out, it's actually a door and you can grab this hook and fold it in and when you push it back into place, it's not gonna take up any space at all really. You really just wanna just step maybe like a little bit half an inch or so, which is very flush to our wall. And since we're over here, we can take a closer look at that finish on top. And right now you can really see that textured finishing that's gonna do a good job of grabbing your tire. While it's gonna have this black vinyl finish to it too. And it's just gonna give it more of a clean look overall. And if this we inchesre outside or maybe you we inchesre riding on your bikes and you have a lot of water left on them, this is gonna help prevent any of that water from making contact with that steel and having it rust over time. This is a pretty great option if you are planning on getting maybe a couple bikes up here because one, it doesn't take up a lot of space here, it's just a small state of real estate we have and it does become more compact. Now if you're looking for something that's gonna be at a little bit more premium price point but has the capacity that load even heavier bikes and accommodate those larger tire size Steadyrack makes a great option too. It's gonna have that ability to swing away. The only drawback to that is it's not gonna take up or not be as small and compact and clean as this design we have right now. But if you are curious about how we got this up here, stay tuned and we'll walk you through the process. Let's start off with installation. We're actually gonna grab a hook and we're gonna find a good point to mount this to. So what we want to do is probably grab a stud finder and locate that stud. We're not gonna do that today just because we do use this spot a lot for a lot of other hook on accessories and we just removed one so I already know these holes are gonna be lined up with a stud. After when you've lined everything up, you know everything's gonna be in the correct spot, we wanna grab our bike to figure out the height that this needs to sit. That process is just gonna be grabbing your bike and lifted it up to your wall. You're gonna line it up with the location where you marked out where your stud is and have everything flush against your wall. After, when you've done this, we wanna go to the lowest point where we're gonna place our hook. And since that pretty much lines up with this hole or it's pretty close, I'm just gonna use this preexisting hole. Now you probably don't have any holes in your wall, so what you'll probably wanna do is just grab a marker or a pen, mark this location so you know where you're gonna place your holes at. I'll give you more of an idea of what I'm talking about. When I place this hook up here, I'm just gonna line it up with this hole in the bottom. Since this hook is higher up, what's gonna happen is its gonna grab your bike and hold it up a little bit higher up, so it's just gonna be off the ground just by a little bit. Once you have that hole lined up, it's not a bad idea to mark out where your other holes are gonna sit. You just kind of roughly mark this. As long as you have that lined up, we can start drilling. With those holes drilled, we're gonna line everything up, make sure everything's looking good, and once it is, we're gonna start putting our screws in place. And then we'll just repeat that process for the other two screws. We're gonna test this out now. The way I like to do this is to grab the frame and grab the fork with my other hand because when we are placing it up here, this is using a door so that will wanna swing open and then we're just gonna rest it on there. I like to make sure my tires little situated, everything's looking pretty good and give you more in depth look at that door opening. You'll be able to swing away your bike now. The caveat of that though is our rear tire is gonna slide forward. So to prevent that we're gonna install the included stopper. And the way that's gonna work is we're just gonna put that right next to our rear tire on this side and we're gonna install this in the wall. This is gonna be the same process where we're gonna find our stud in the wall and it should be lined up from the top. And you're gonna pre-mark your holes, line everything up and then drill this into place. We are going throw this up here one last time to make sure everything's lined up is looking good and set it down. With it in place, I wanna check my swing feature to make sure everything's in the right spot. Lemme move my tire. There we go. And that's looking pretty good. And that was just a look at the installation and some of the features of the Feedback Sports Velo 2.0 bike wall mount. Thanks for watching.


It works. You will definitely need the longer hook for mountain bike tires. Easy to install. They do flex some with a 30lbs bike on them.
I love this product - it's simple and robust. It does what I expect it to extremely well.
The product is excellent it was exactly what I was looking for to hang my new bike in the garage. The hanger is sturdy was very easy to install and fits all my needs. I am very pleased .
Works fantastic! You'll need to order larger hook for MTB tires though.
Good product for hanging bike flat against the wall. You will probably end up still scuffing the wall. Also for me I put in with a giant toggle bolt which is going to keep it secure, but is going to do some damage to your wall (wouldn't be necessary if you can find the stud). So good product and space saving for an apartment
These hinged storage racks are very easy to install and work flawlessly. Bikes are up and out of the way when not in use and are easily accessible when ready to ride. Great product!
Great product. Works just as advertised. My favorite part is that the bikes "fold" in closer to the wall and don't take up as much area in my shop. Very happy with this storage solution!
Great bike hooks! Simple to install and great quality! Also customer service is the best at etrailer they are on it!!! Just all around amazing company!
Love these bike brackets. They were easy to install and perfect for our loft location. The brackets keep our bikes out of the way, while looking stylish in the loft setting. And it's easy for me (5'4", 120lbs) to get the bikes on and off!
Overall its a strong sturdy product with a solid concept. I hung 6 bikes using very little space. The drawbacks; the rubber on the hook is flimsy and weak. The rubber on two of the hooks is already tearing and coming off with each use. I've had to wrap electrical tape to avoid damaging my bike wheels. The other drawback is the bottom bracket that stabilized your rear wheel. To short to hold wheel and will slip when rotating bikes.
Very strong item. Made of thick steel. Even holds large mtn bike tire Bottom tire bracket could be designed deeper but it works.
I ordered 6 of these to hang my family's bikes in the garage. I was a bit surprised that there were no reviews when I purchased--the price is right and the material is made of heavy steel. Easily reversed the swing direction and when mounted to studs it appears to be solid. It seems like a more cost effective approach than the other $70 pivoting/hanging bike rack.
Easy to install. Bikes look great. Definitely get the long hook if using this for mountain bikes. I tried both and The shorter might fit but it is more troublesome to hook in and out. If installing in a concrete wall use 3/16 tapcon screws with a 5/32 bit.
well the mount looks sturdy enuff; but, no instructions on removed cardboard back, looked like screw driver, nope - finally realized it was to pinch off! Also, can you place higher than 6 feet? No real good idea there, and is the diagram at bottom a way to 'reverse' like L or R? Have yet to put up
This is the best bike rack on the market. It is PERFECT if you have limited garage space or just prefer that your bike(s) don't take up tons of space. They are very sturdy and strong (hang them from a wall stud, obviously), and the brilliant addition of a hinge to a vertical bike hook allows a bike to hang surprisingly flat against a wall. If you have multiple bikes and want to maximize space, hang each bike so that handlebars align with gaps in the frame of the other bikes (see included photo). I only have about 7' of wall space, and I fit three bikes with room for a fourth, and they barely stick out from the wall (not even as far as my trash can!). IMPORTANT NOTE - I have two 29ers with 2.3" and 2.4" wide tires and the standard hook could not hold them. The standard hook was perfect for my road bike, but for mountain bikes you definitely need to purchase the larger hook (Item # 301-16858, "Long Wheel Hook for Feedback Sports Velo Hinge Bike Storage Rack").
Info for this part was:
At etrailer we provide the best information available about the products we sell. We take the quality of our information seriously so that you can get the right part the first time. Let us know if anything is missing or if you have any questions.


Thank you! Your comment has been submitted successfully. You should be able to view your question/comment here within a few days.
Error submitting comment. Please try again momentarily.